Jag deltog nyligen i en diskussion på http://violinist.com om att stämma fiolstall. Diskussionen kom också delvis att gälla justering av fiolkroppen.
Jag gillade skarpt David Burgess kommentar: ”Bartender, may I please have ten shots of whiskey? ;-)”.
David Burgess är en extremt framgångsrik fiolbyggare med instrument som enligt dubbelblind lyssnartester helt kan mäta sig med de gamla mästarnas instrument. ”Klassiska” fiolbyggare justerar fiolkroppens plattor innan de limmas på sargerna. Resonanserna ändras med 10 – 15 Hz då fiolen lackeras och ytterligare då plattorna limmas på fiolen. Det klassiska byggsättet gör alltså justeringa delvis i blindo eftersom efterjusteringar betyder att instrumentet måste brytas upp och delvis lackeras på nytt. Att bryta upp ett instrument är alltid riskabelt eftersom locket kan skadas.
Det klassiska sättet att göra stall bygger på goda tumregler d.v.s. man har en ”god” mall som man försöker efterlikna så väl som möjligt genom en god arbetsprocess. Problemet är att stallets små dimensioner gör att det inte är möjligt att stämma stallets olika resonanser genom att helt enkelt göra en identisk kopia av ett bra stall. Man kan antagligen komma rätt nära genom att kopiera men det enda pålitliga sättet att nå målet är enligt min uppfattning att lära sig att lyssna och genom att fila stallet då det är på plats i fiolen. Genom att fila det monterade stallet kan resultatet höras mycket snabbt efter små justeringar.
Nedanstående inlägg är på engelska:
http://www.violinist.com/discussion/response.cfm?ID=25371
Bridge tuning
How does one tune the bridge to the violin.
From kypros christoudoulides
Posted on February 28, 2014 at 10:22 PM
Hello,
Somewhere on this board,the topic of tuning the bridge to the top plate was mentioned.
Could someone explain how this is done and what are the benefits.
From John Cadd
Posted on March 1, 2014 at 10:55 AM
I think the main articles come from Sweden under ”The Bridge Hill”.The resonant frequency that seems to give best results is 2.9Khz . That happens to be the frequency our ears are most sensitive to . If you have a few spare bridges around the house try listening to the sound they make when dropped on a hard surface. Most likely they will all ring to a different note . You can compare that test to coins dropping on the floor. Each coin makes a fairly consistent sound if its a penny. A five pence piece will have another sound. The Swedish people clamp the bridge feet and knock the side edge to test the frequency .Depending on where you remove wood the pitch can be raised or lowered . In practical terms if you get near the 2.9 Khz it definitely improves the sound. Ask your friendly luthier . It may not be exactly 2.9 for every single violin in the whole wide world . But we all knew that .
As far as I knew the frequency was 2.9 but seems to have shifted down to 2.5. There is a range between 2.5 and 3.4 so I am in the middle .A good tip is to stop before the bridge snaps. But we all know that .
This frequency (area / plus or minus ) will affect clarity and brilliance . That`s the bottom line effect .
From Don Noon
Posted on March 1, 2014 at 03:43 PM
Joseph Curtin wrote an excellent paper on the topic which can be viewed at: http://www.josephcurtinstudios.com/images/BridgeTuning.pdf
There are references to other papers on the topic, for those interested in researching. A key point in Curtin’s paper:
”…the interaction of the bridge with the
strings and the violin body is complex and not yet fully understood. The bridge resonance, described here in isolation, to some extent disappears into an intricately coupled series of resonances.”
A 3kHz lateral bending resonance of a free bridge with its feet clamped in a vise does not remain a 3kHz resonance with its feet placed on a thin spruce plate and with strings across the top. At best, it is a guide for getting a more consistent bridge stiffness, if that seems important.
In my limited casual testing, I could not measure any of the resonance/filtering predicted effects of the bridge lateral mode, until it got very floppy, which killed off the high frequencies. So I don’t bother with tuning the bridge. I DO pay attention to mass.
From Adrian Heath
Posted on March 1, 2014 at 07:02 PM
I tried lightening two identical bridges by the same amount:
– the first, I thinned all over;
– the second, I left thick, and enlarged the heart and kidneys (yuk!).
Both techniques allowed the violin to respond more easily, but with reduced brilliance. In both cases, there were new, different,slightly ”honky” resonances. I suppose the best is a bit of each.
Thinning the top half, on the other hand, is like removing a mute: a harsher, brighter sound.
From Lars Silen
Posted on March 2, 2014 at 08:21 AM
Violin bridge adjustment is very interesting and rewarding as long as you follow a few simple rules:
1) Make sure that you know how the bridge is removed/installed without damaging the instrument. If necessary ask somebody who knows to show you.
2) Always make a new bridge and do the adjustments to the new bridge. If you don’t like the result you can always go back to the old bridge.
3) Experiment on a cheap violin where a few scratches don’t matter.
How do I do it?
Play the violin using the old bridge and try to describe the good points/bad points. Write down your description for future use.
If the old bridge is properly done, use it as a template for the new one. If the material of the new bridge is very dense (compared to the original) make a slightly thinner bridge, if it is soft make it slightly thicker. Usually it is a good idea to increase the height of the arc between the bridge feet slightly (it is often completely straight). Don’t increase the openings in the hearth and ears yet. Make sure the bridge feet are properly fit to the top (google about how this is done there are many methods).
Install the new ”raw” bridge on the violin and use new strings of the same type you intend to use in the future. A good starting point could for example be Dominant strings. The adjustment described below will automatically be made relative to the strings you install now.
Play your violin and try to describe good points/bad points regarding the sound. Let’s assume that the bass side is slightly dry/harsh with a D-string that is unresponsive. Generally it feels like the violin needs to be opened compared to the old bridge.
We start by ”opening” the violin. Using a thin small file (I use small Biltema diamond files and use for example a thick paper to protect the varnish) file the arch between the feet. Making the arch higher opens the violin to a certain point. The filing is done with the bridge in place and the instrument is tuned and playable. Don’t over do it. The effect is strong. File a few turns and then play the instrument and listen. Try to judge the changes to the different strings. Try to file under the A and E strings and listen. Then file under G and D, what was the difference?
The G and D strings were dry. We can make the sound softer/”warmer” by filing the arc between the bridge feet under the A and E strings. Measurements seem to indicate that this changes the over tones which is heard as a nicer/warmer bass.
The D string was slightly unresponsive, if this is still the case increase the opening in the heart slightly under the A string. File 2-3 turns and then listen, you are taking of some small fraction of a mg of wood. The general rule as I see it is that the bass sound is adjusted on the discant side of the bridge and the discant sound on the bass side of the bridge. My experience is that generally the starting point with a roughly symmetric bridge causes the bass side to be too dry. This means that generally you have to file more on the A and E side of the bridge to compensate.
See: https://larsil2009.wordpress.com/2013/03/07/trimning-av-fiolstall/ (the text is in swedish, use google translate).
Try thinning the channel between the heart and the E side ear opening. This makes the bass side (G and D strings) warmer. Remember we talk about very small changes. File a few turns and listen. Increasing the opening in the ”ear” under the E-string influences the sound of the G-string. If you make the G-string too soft you can add some harshness by filing the opening in the ear under the G-string.
Increasing the heart opening under the D string increases the volume of the A string.
Increasing the heart opening under the A string increases volume of the D string.
Notice: Adjusting for example the A-string will always cause some ”spill over” to the D and E strings. Any change you do will influence the whole bridge and the corresponding sound but the main effect will be as described.
Experiment by filing and listening, the general ”rules” are given above. The key is really to learn to listen so you are able to identify problems.
You will for sure destroy the first bridge you try this out on because the effect of filing is very strong and you will get greedy. The result will be an unpleasant ”nasal” sound where the response is too strong between 1 and 2 kHz. No problem! Blanks are cheap, make a new raw bridge and start again and learn not to be too greedy 😉 . If you think you went only slightly too far wait a day or two. The filed surfaces harden when they are in contact with the air. This means that the effect of the filing will slightly back off so when you went slightly too far it may be perfect don’t throw the new bridge in the trash bin yet!
The real key to this adjustment method is that you are able to do very small changes and then play/listen immediately while you still remember the sound before the previous adjustment … the adjustment/play cycle should be perhaps 30 seconds. If the same changes were done on a work bench the cycle time would be 5 – 10 minutes with a need to re-tune between rounds … very inefficient!
Because all sound is entered into the violin through the bridge the bridge is obviously a very important ”filter”. My experience is that for example inexpensive ($200 – $300) Chinese violins can be improved very much through bridge filing. This is of course not a silver bullet. You will reach a state when the body of the violin becomes the limiting factor. You cannot make a top violin from a cheap Chinese whatever you do but you can improve it very much. Of course the next step is how you improve the body of the violin when you have identified that the problem is in the body. This could be the topic of a future sermon …
/Lars Silén (physicist Finland)
From Richard Saw
Posted on March 3, 2014 at 05:43 AM
Lars Silen: Thanks for your information and website link.
It helped to understand a little more about these odd-shaped violin bridge on http://www.violinbridges.co.uk
Can you suggest some way to making the violin tone deeper by tuning the bridge (beside Changing strings, soundpost position may be other option)?
Look forward to read your post and further research
From Lars Silen
Posted on March 3, 2014 at 06:30 AM
Hi Richard. You can make the tone deeper/warmer by filing the A/E side of the bridge. This works to a certain point but if you aren’t able to go as far as you want you have to modify the violin body. The modification to the violin body to get a darker tone is to make the channel between the neck and the bass bar _slightly_ thinner see the technique at https://larsil2009.wordpress.com/2013/10/11/hur-snabbt-slipar-man-med-magnet/ (again google translate is needed, Swedish).
Back to the bridge:
Try filing the following parts iteratively but roughly in this order:
1) File the arc between the bridge feet but file more under the A/E strings. (Listen)
2) Increase the size of the (big) hole in the ear under the E string. The channel between the heart A side and the E side is thinned but file the hole to keep the hole pleasant to look at. Most important again:listen to changes in tone color.
3) If needed file the heart under the A string to balance (increase) the D string volume compared to the other strings. File the heart under the D string to adjust the A string volume. Warning: If you make the heart to big the sound becomes ”nasal” and unpleasant.
4) If the bass side gets too nice and round and uninteresting then file the G side ear side and opening which adds ”some sting” to the bass. If you over do it the bass gets dry.
Go back to step 1 and start a new round.
It is usually a good idea to do one round and then play the instrument for one or two weeks before the next round to allow the bridge response to be stable. You can hear that the filed bridge to some extent goes back to the state before filing (which is fortunate!).
The key is to do only small steps and to learn to listen. As a general rule you get more volume by filing the openings in the arc, the ears and the heart. Overdoing it gives you an unpleasant nasal sound so you have to experiment and you have to learn to listen. Good luck!
From Richard Saw
Posted on March 3, 2014 at 07:29 AM
Thanks…
I will try to tune the bridge.
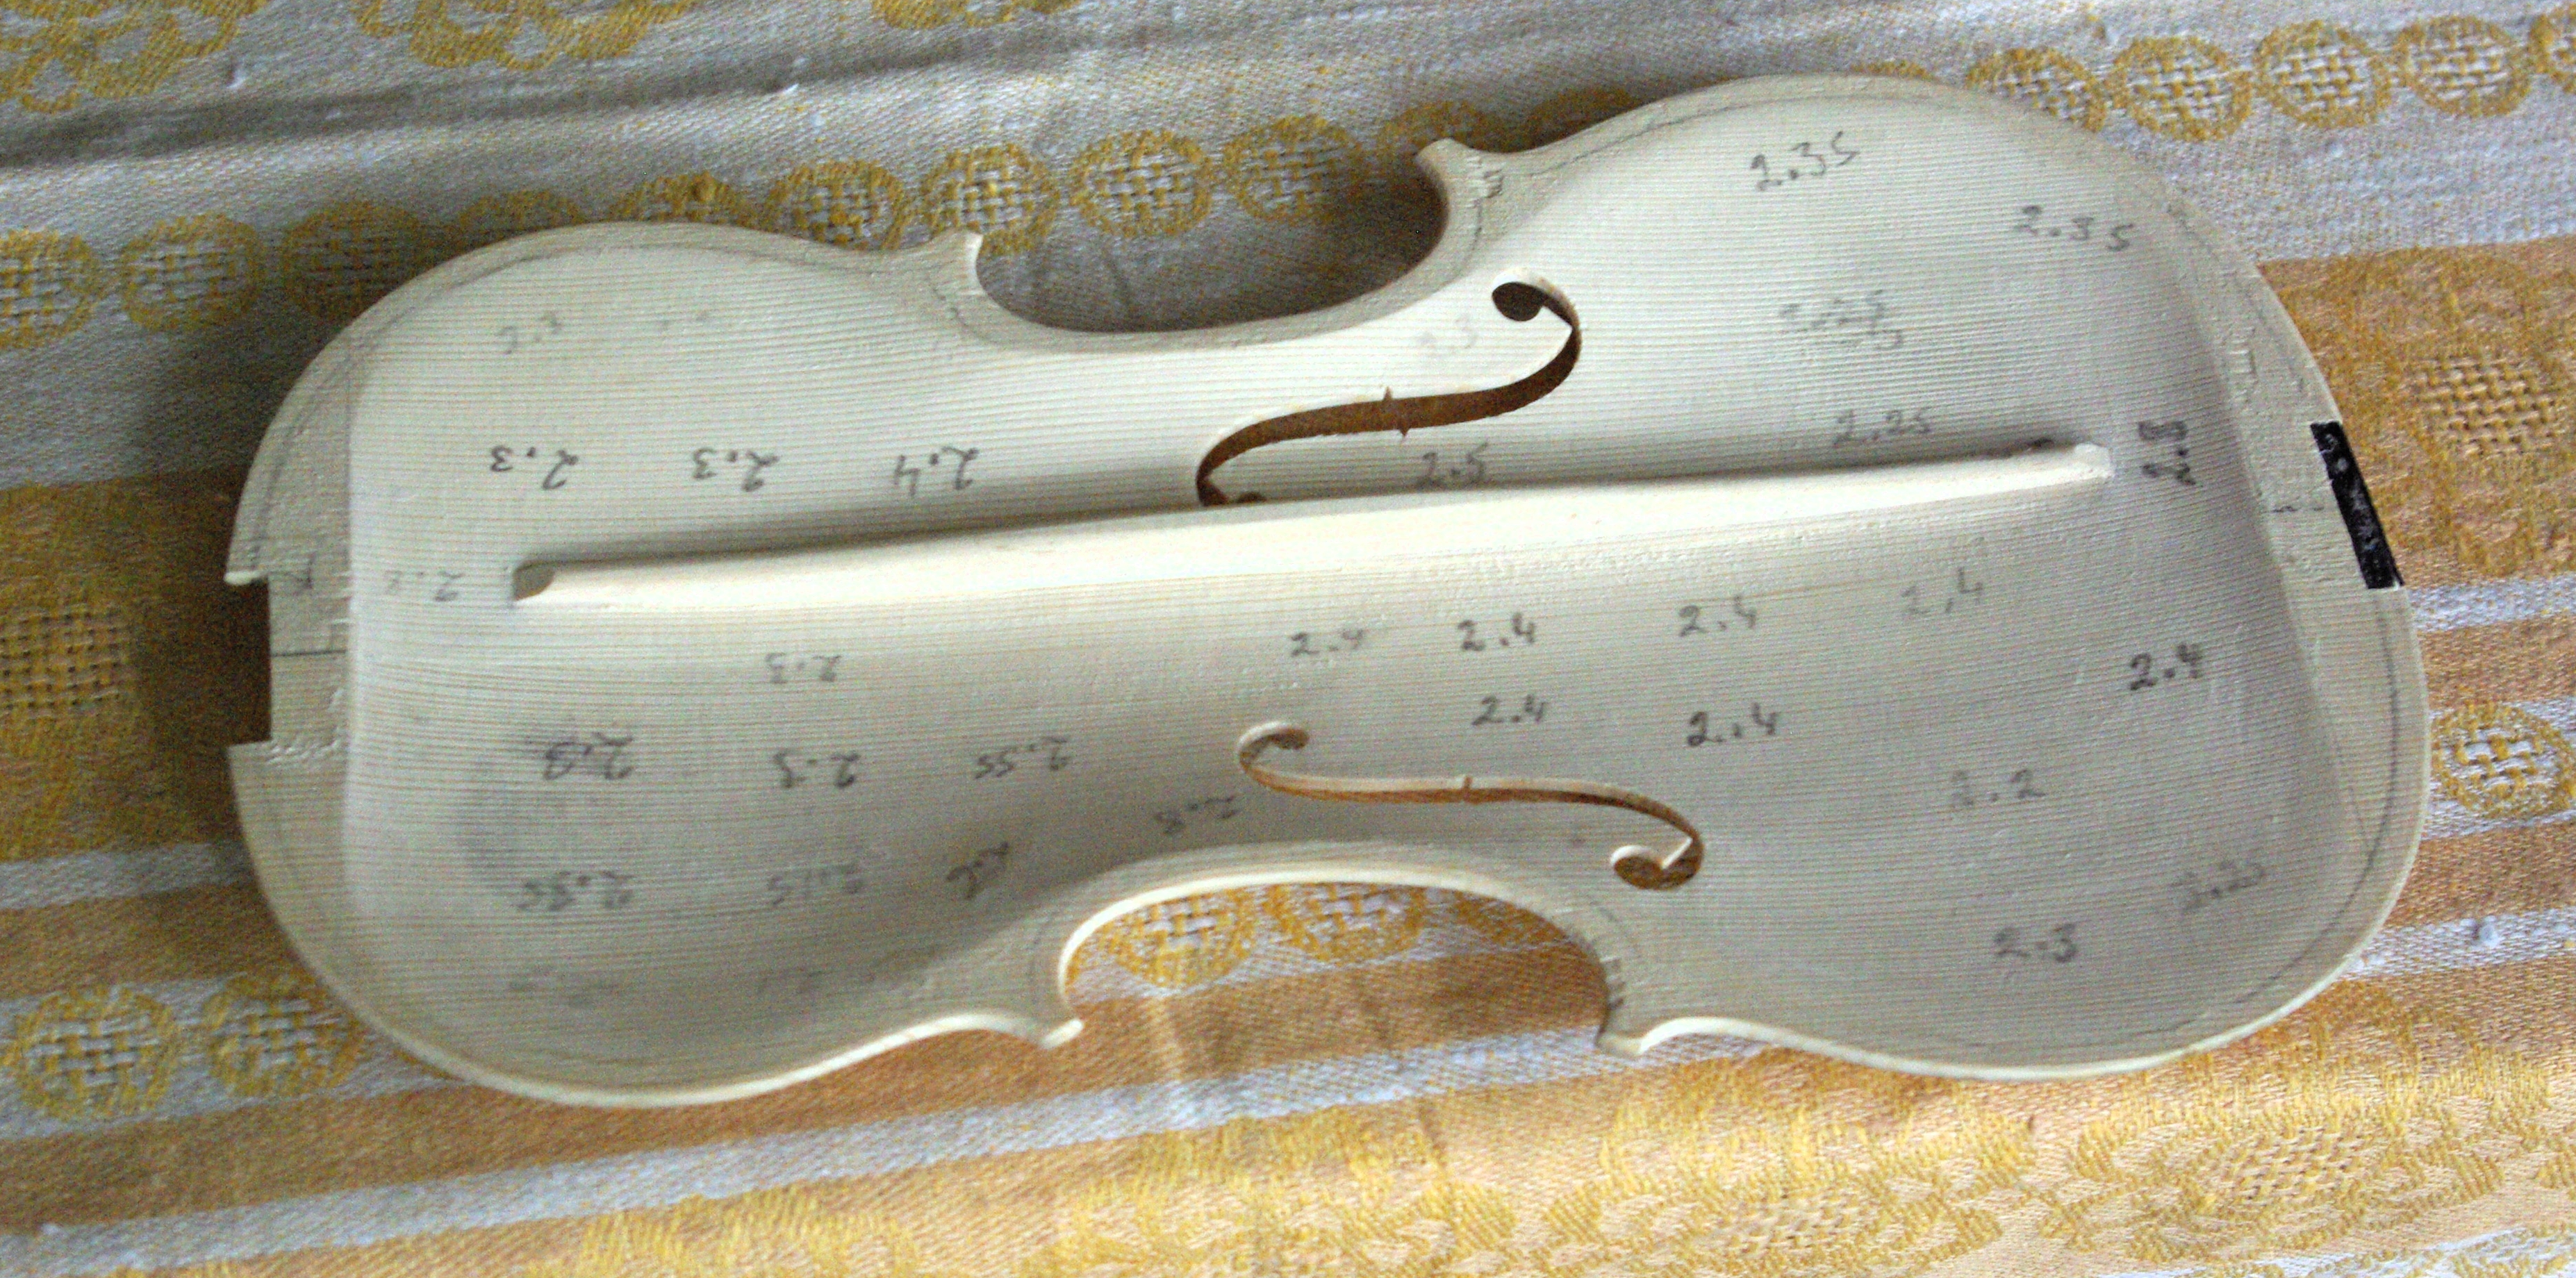
Also, I am building a violin from half-finished violin. I can thin the top plate accordingly although I just afraid that over-thinning the plate will make hollow sound eventually.
I saw from some Strad CT scan that there are two spots neat the end of bassbar (one on upper bound and one on lower at bass side of the violin). I think i will follow the scheme to see how it sounds like.
From Lars Silen
Posted on March 3, 2014 at 09:39 AM
Hi Richard. I have successfully, I think, used Tibor Varga’s graduation (Guarneri del Gesu) as a template for my own experiments. The channel I mentioned should be _reasonably_ thin, check graduations of a number of known _good_ violins on the internet. Tobor Varga’s seems to be ok. What I have been using is: http://www.google.com/url?sa=t&rct=j&q=&esrc=s&source=web&cd=1&cad=rja&ved=0CCgQFjAA&url=http%3A%2F%2Fwww.roger-hargrave.de%2FPDF%2FArtikel%2FStrad%2FArtikel_0000_00_Gesu_1773_PDF.pdf&ei=jkkUU6TzHe3n4QTg3YDoDQ&usg=AFQjCNEEPCQAOmNJAonQPiI9Dj2y73p-TA&bvm=bv.61965928,d.bGE . The violin was played by the famous Hungarian violinist Tibor Varga. I think Hargrave’s measurements show reasonable thicknesses. Don’t make the channel thinner because the sound easily gets too dark. If the sound is too dark for your taste you can compensate by sanding the channel at the other end of the bass bar. This makes the sound ”lighter/less dark”. The distance from the sound post to the neck/bass bar channel is longer than the distance from the sound post to the string holder/bass bar channel. This is why the former brings darkness to the sound and the latter makes the tone color lighter.
You can do small adjustments after completing the instrument through internal sanding also outlined on the website (on the completed and playable instrument). I strongly believe in doing adjustments to the completed instrument because this is the only way of being objectively able to listen to changes in tone color. It is easy to hear 10 micro meter changes in thickness to for example the neck/bass bar channel. Thickness changes of this magnitude can not be measured using conventional methods (the measurement limit is at 50 – 100 um).
From David Burgess
Posted on March 3, 2014 at 08:37 PM
Bartender, may I please have ten shots of whiskey? 😉
From Lars Silen
Posted on March 3, 2014 at 08:57 PM
Yes David, please help yourself!
David, I think there are lots of readers that would like some real comment from you. I know this isn’t the normal way of making/adjusting a bridge. You are an extremely well known and successful builder so please explain why you need those ten shots of whiskey?
😉
/Lasse
From David Burgess
Posted on March 3, 2014 at 11:16 PM
Until I come up with a lot more time and patience, I’ll let my prior comment stand as an allegory or metaphor.
From Adrian Heath
Posted on March 8, 2014 at 11:41 AM
Lars, copying the thicknesses of another violin is meaningless, since a competent maker will be responding to wood density, elasticity, grain type, etc., as well as tapping and flexing the plates before assembly. Two planks from the same tree will not sound alike, even in the hands of the same maker.
Playing – carefully! – with the bridge is harmless and instructive (see my above post?); annoying the sound-post is very risky, and filing wood from inside the plates cannot be reversed…
However, there is a video by the physicist William Fry, acompanied by a competent violinist, where he gently scrapes three strategic places inside the belly: despite the conference-type microphones, we can hear him audibly transform a 500 dollar fiddle into a 2000 dollar one, step by step.
While we should be wary of being Sorcerer’s Apprentices, we can learn much from acousticians such as William Fry or Don Noon, who have the patience and curiosity to try and improve trade fiddles, and seek out the tricks-of-trade which have become embedded in Tradition.
Etienne Vatelot relates how Arthur Grumiaux left his Strad for a day or two for tone adjustment, and was very pleased with the result; but Vatelot had not had time to touch the violin! The ”improvement” was perhaps partly imaginary, and partly due to changes in the weather affecting wood, gut, and rosin….
From John Cadd
Posted on March 10, 2014 at 08:33 AM
Why is copying thicknesses meaningless? Vuillaume did very well using that method . Lars has probably worked out sound reasons for his technique .
From Adrian Heath
Posted on March 10, 2014 at 03:35 PM
Please excuse my arrogance! I imagine (while hoping for expert information!) that it is useful to know the relative thicknesses in different parts of the plates, but the actual thicknesses will depend on the characteristics of the chosen wood: e.g. longditudinal vs. lateral stiffness, grain fibre diameter, or internal damping of vibrations.
In spite of my previous post, I don’t doubt the finesse of Lars’s ear. I have even tried William Fry’s techniques on a gritty trade fiddle, and sweetened it somewhat. But don’t tell David, though, I should hate to push him towards an extra ten whiskies…
From John Cadd
Posted on March 10, 2014 at 07:09 PM
I thought this question was about bridges . Oh you thought the idea was to alter the belly as well as the bridge . No , leave the belly as it is and Match the bridge to the belly if you want to . The Bridge Hill sites don`t say a lot about the relation between bridge and belly but your ears will decide what you like . Try several ways till you like the sound .Make careful notes and hope it works .
From Adrian Heath
Posted on March 11, 2014 at 07:50 AM
Yes, back to bridges! (Though it is Lars who wrote of scratching the belly..)
When I compare the tone of my viola with its original English bridge, and with that made by my French luthier (where the cutouts have been much enlarged), the tone is smoother but more nasal with th French bridge. I use the English one, but if I have to leave the viola for repair or adjustment, I shall swap the bridge: I fear that the French luthier will adapt it.
From John Cadd
Posted on March 11, 2014 at 09:07 AM
Nice to have physical proof that a change occurs with a different shape. Nobody can tell you it`s all your imagination .
From Hermann Janzen
Posted on March 11, 2014 at 05:04 PM
Lot’s here on violin bridges any thought on Cello bridges, Lars?
From Lars Silen
Posted on March 11, 2014 at 09:37 PM
Comment to:
Adrian Heath
Posted on March 8, 2014 at 11:41 AM
Lars, copying the thicknesses of another violin is meaningless, since a competent maker will be responding to wood density, elasticity, grain type, etc., as well as tapping and flexing the plates before assembly. Two planks from the same tree will not sound alike, even in the hands of the same maker.
—-
You are correct in that simply copying the graduation is meaningless because you can hear changes when doing internal graduation that are smaller than what can be reliably measured. The instrument used to measure the thickness will make a dent that is deeper than the thickness of the material layer you removed.
Obviously this also means that simply mechanically copying a good violin won’t give a good result. Adjustments have to be made by ear not by mechanical copying. I approximate the thickness removed by counting the sanding turns. The exact thinning is only of academical interest though. 10 micro meters is easily audible when thinning is done at a critical place. I have separately measured the sanding speed on similar materials. There is a reason why you tune the strings on a violin by ear and not by tensioning the strings to a pre-set mark. Everybody knows that you can’t tune the strings mechanically by tesioning to a ”A-stop”, ”E-stop” … why should you then be able to tune the resonances of the instrument by mechanical copying of dimensions … it isn’t possible.
I think that taking some ”well known” instrument’s graduation as a starting point if the wood you are working with is reasonably ”normal” is actually OK. Leave the thickness generally slightly thicker than your graduation template says. If you make the plates too thin you cannot back off … at least not much. If you leave the plates too thick you will have a lot of sanding to do at 1/10 000 mm/turn.
My method is to check the m2 and m5 ringtones when graduating (top is initially free but with bass bar glued in place, the bottom is glued to the ribs and graduation is done in situ). You can easily hear when the plates start to work. The sound goes from a dull ”thonk” to a musical tap tone. I try to go close to my model (Tibor Vargas Guarneri) graduation within reason and I stop when the top/bottom go from dull to musical. This is the starting point for further adjustments when the instrument is assembled and varnished and a rough bridge has been made.
The actual adjustment is iterative meaning I do small changes to the bridge. When bridge changes don’t give the result I want I check the basic resonances B0, A0, A1, B1- and B1+ (using Audacity).
There are lot’s of ideas floating over the net on how the plates can be adjusted. Because I do internal sanding of the completed instrument there is no problem with some thick spots in the free plate graduation … errors can easily be corrected by thinning the proper spots and the result can be checked by playing the instrument within 30 seconds because the instrument is playable all the time. The main problem with internal sanding of the completed instrument is that there are no good examples available. I have had to explore this kind of adjustment myself … and I am still learning.
– Initially I adjust the m2 and M5 modes.
– After this I do a round on the bridge because doing changes to the body allows me to go further on the bridge.
– Most factory violins are improved very much by sanding the C-bout on the E-string side. This seems to be a builders ”secret” that at least Hungarian builders know. I saw clear marks that the C-bout had been modified on some Hungarian top violins (from the outside). Why destroy the varnish when you can sand as easily from the inside?
– When the m2 and m5 modes seem to work I start to sand B1- and B1+ in place. Some places giving a very strong effect are at the ends of the bass bar. There are a number of pictures of these modes floating around (Chladni patterns). Essentially you sand on the node line to help the plate to vibrate on both sides of the node line. You can very easily hear the effect of this kind of sanding.
– After this a go back to the bridge and adjust it some more.
– Checking the tail piece resonance. Usually the tail piece has to be lightened on a Guarneri where the A0 resonace (277 Hz) is higher than on a stradivarius (a have never yet made a Stradivarius).
– Remember that internal sanding will destroy the internal surface. You can actually hear the surfaces heal after sanding. If the sound got brighter (from dull) when sanding you will first hear what you wanted to hear and then during the next few minutes much of the dullness returns when the surface hardens again. The hardening will continue (the basic b1- and B1+ frequencies will generally rise) the next few days.
For me adjusting a new instrument will take perhaps 2 – 3 weeks working now or then because you want the instrument to stabilize between turns.
I think the general ideas regarding plate tuning frequencies are sound:
My present #4 Guarneri has
B1+ – A1 = 56
Which places it somewhere between an orchestra violin and a soloist instrument. I assume both b1+ and b1- will rise when the plates heal which means that within a few weeks it will probably be in the ”soloist” range of instruments. The instrument sounds very nice!
My #1 Guarneri has:
B1+ – A1 = 80 Hz
A1 – B1- = 8 Hz
B1+ – B1- = 90 Hz
I have had the violins tested in the Tampere talo music hall and the result is, I think good. My son is a professional violinist working in the Tampere philharmonic orchestra see http://www.sebastiansilen.com/ . The number #1 is very responsive and very bright. It is possible that I have to drop the b1+ resonance slightly in the future … time will show if it is necessary.
From Lars Silen
Posted on March 11, 2014 at 10:21 PM
Back to the bridge!
A violin consists of two critical parts. One part is a reasonably well working body. Obviously essentially all the sound that is generated goes via the violin body … nothing strange here.
Next question:
Which way does the sound energy enter into the violin body?
Answer:
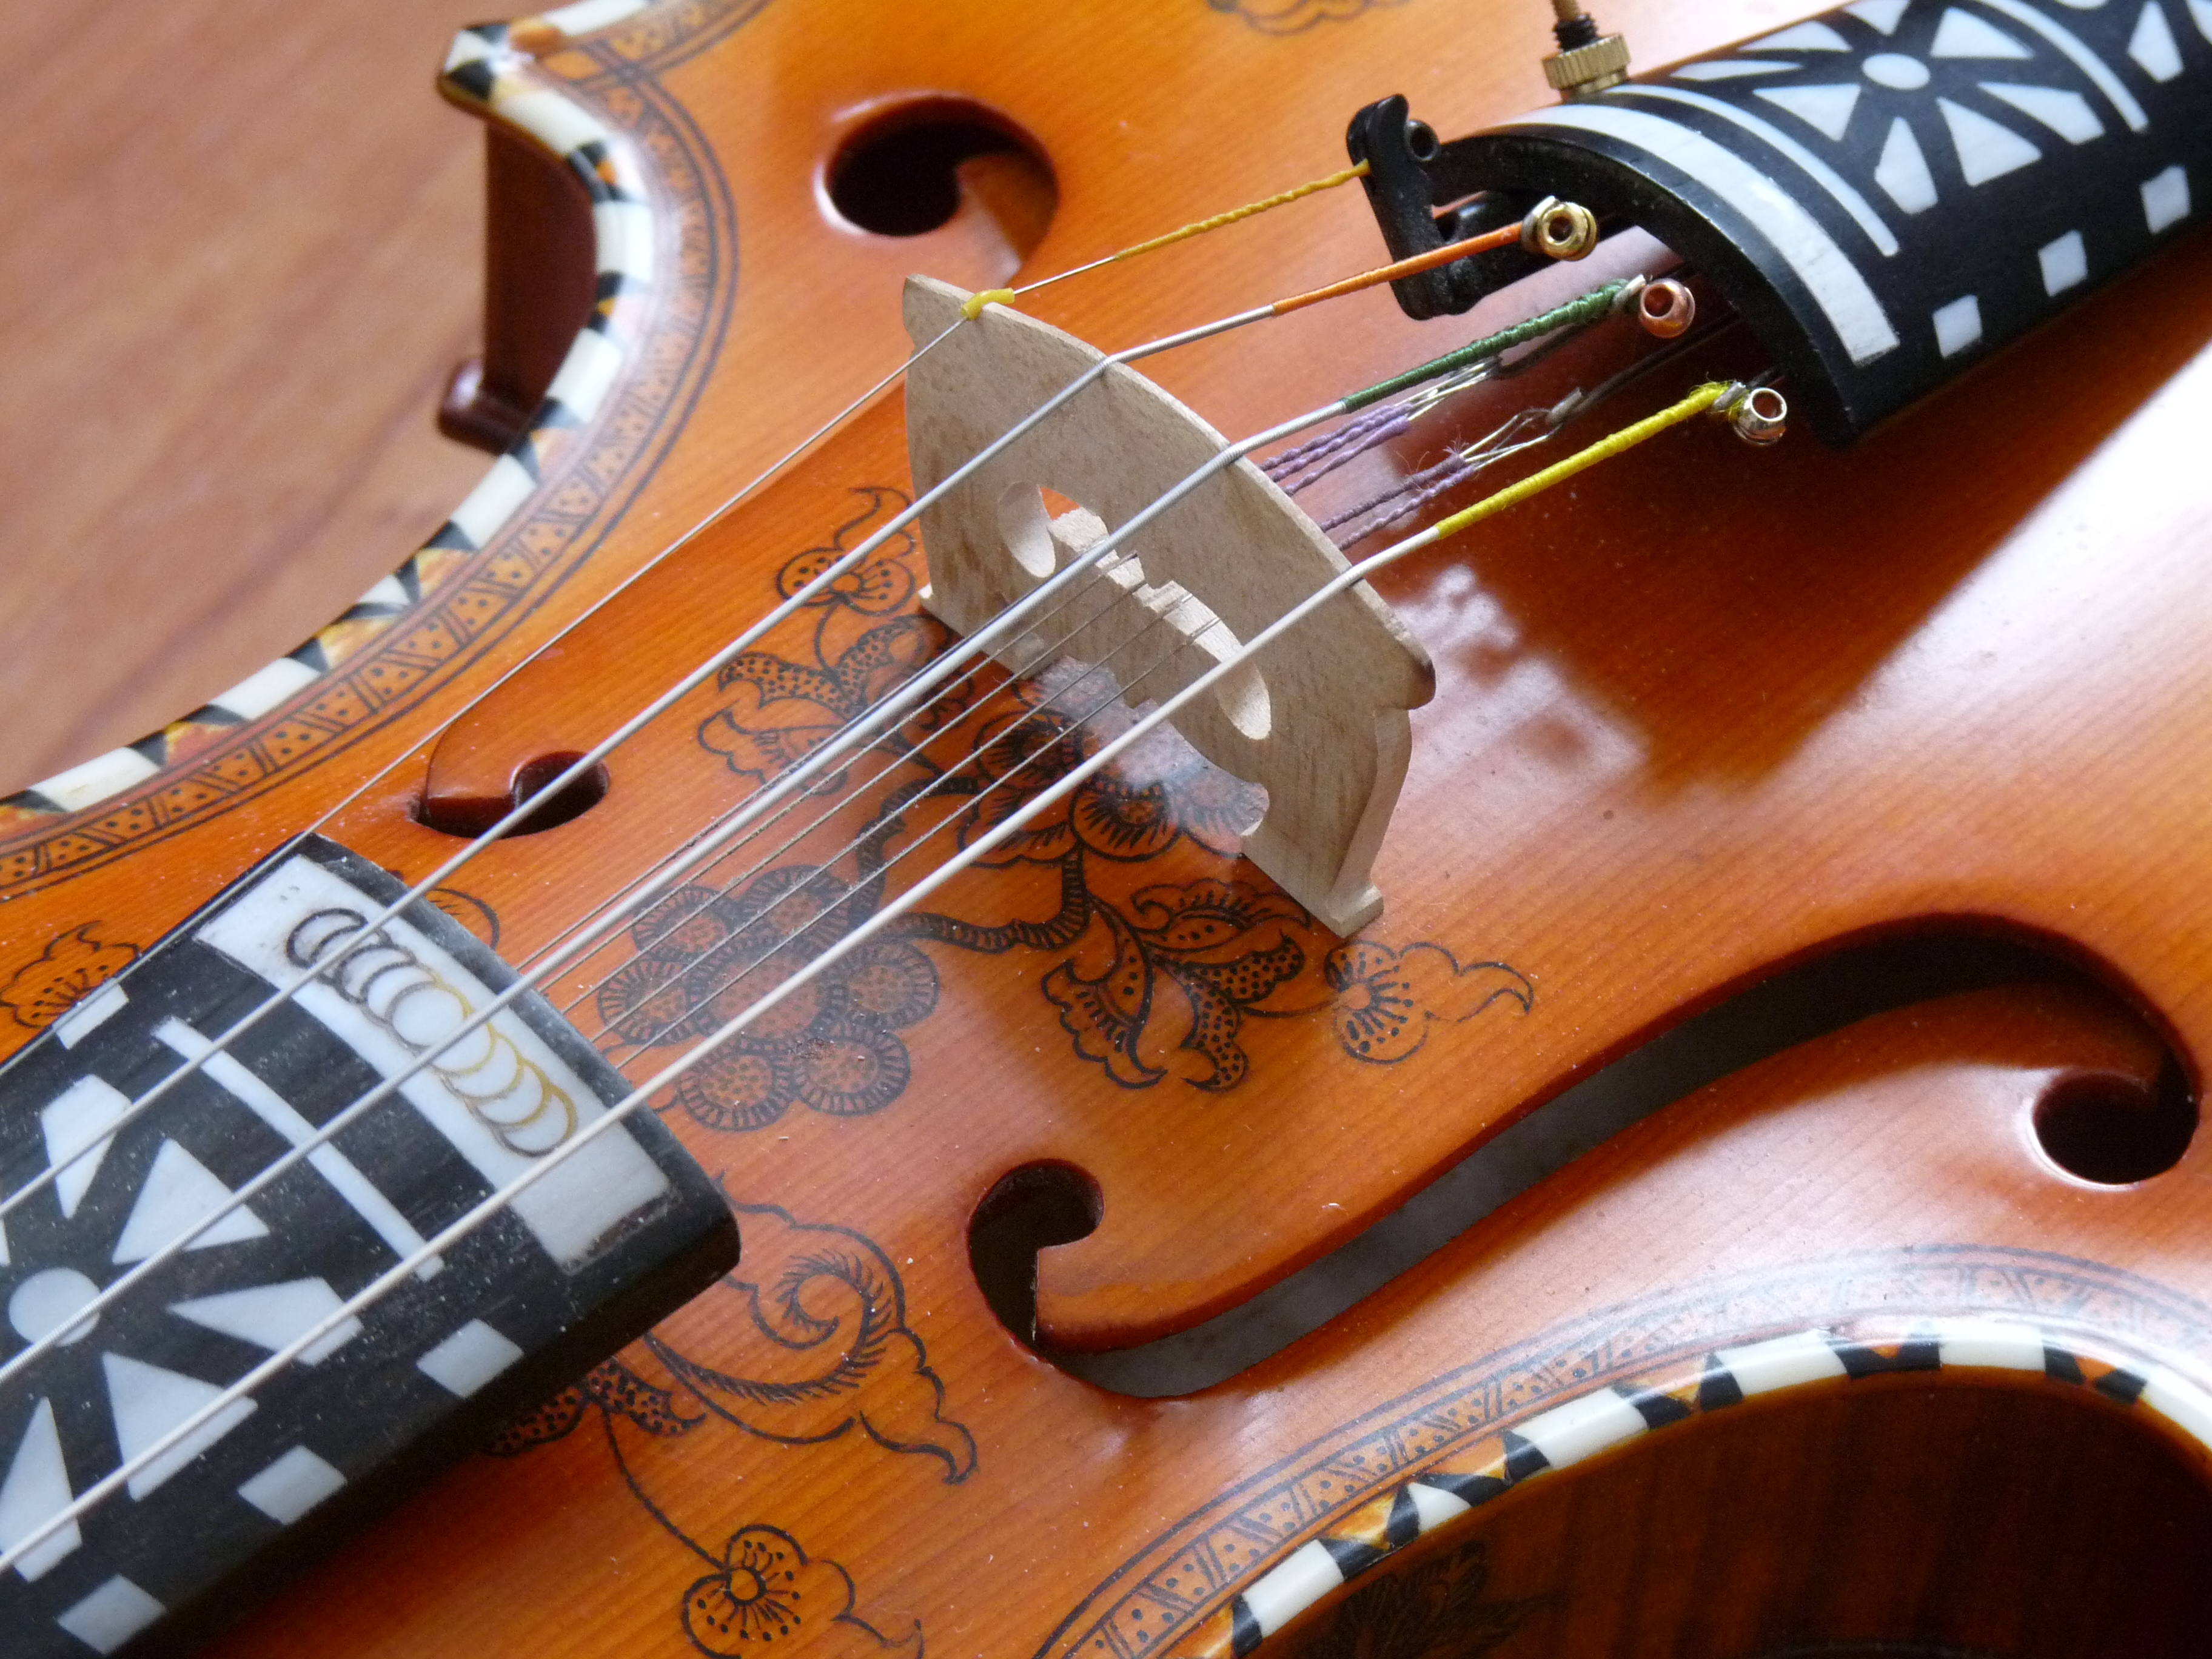
Because essentially all sound energy that enters the violin goes via the bridge it is obvious that the bridge is critical as a transmitter/filter of mechanical energy.
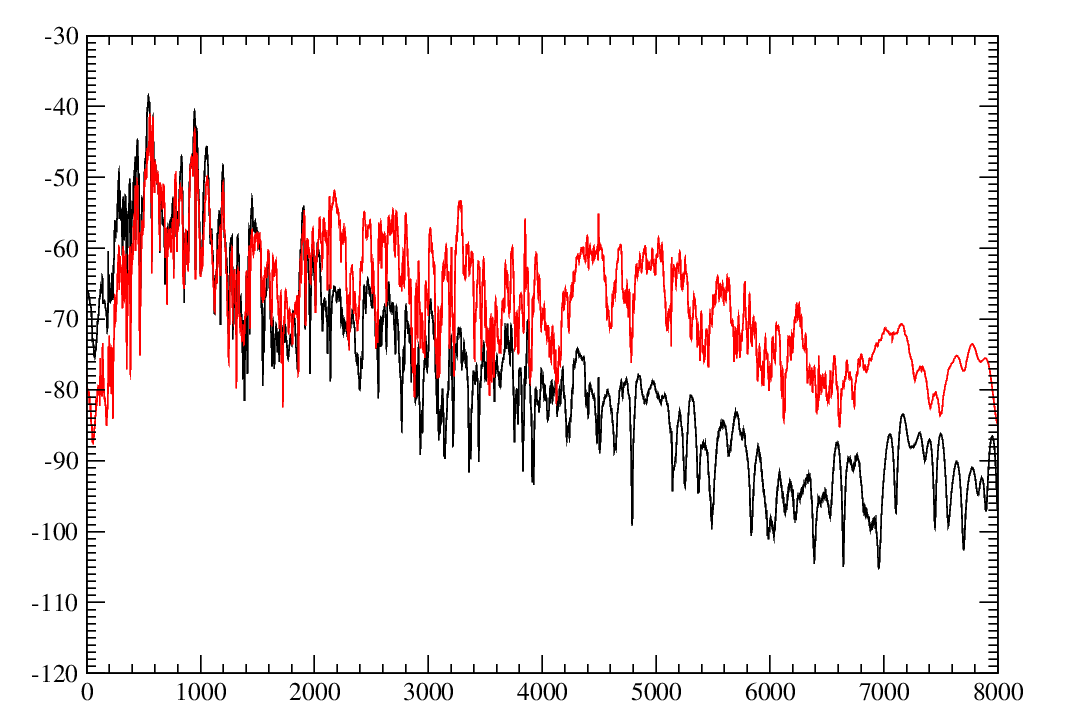
The violin body and the bridge are thus two complementary parts for producing sound. A properly tuned bridge has its main resonance quite far above the body resonance where the response of the body starts to drop off by 6 dB/octave. The bridge provides a very sharp boost of the higher frequencies essentially extending the frequency range of the total instrument from perhaps 2 kHz to 5 kHz and above.
It is sometimes useful to do some back of the envelope calculation to get a feel for the energy flow through the bridge. Assume that we are generating 1 W of mechanical power using the bow. This energy enters the violin via the bridge feet. What is the energy flow/m² going through the bridge feet (1 cm²)? P = 1W/0.0001m² = 10 kW/m². This is some orders of magnitude higher than the power flow/m² going through a big loudspeaker. Any small fault in adjusting the feet but also different resonators in the bridge will have a huge effect on sound.
Has somebody by the way ever measured the heating of the bridge feet when playing forte. This should be fairly easy to do using a non-contact IR thermometer.
Again, exactly as with the violin body it is easy to see that the dimensions of the bridge are so small that it is impossible to mechanically copy a good bridge. Good workmanship allows a skilled luthier to get fairly close … I have heard of luthiers that have made 10 to 15 bridges for a violin until they accepted the result. This is something that could be called trial and horror … mostly horror. Mechanical copying can provide a good starting point but why not do the final adjustment by ear … typically one bridge blank is needed then.
From Adrian Heath
Posted on March 11, 2014 at 10:27 PM
Lars, I have not come across refences to ”m” modes, but I have copied your posts for comparison with others.
(Google makes a terrible, often amusing, hash of translating your web pages.)
I myself have only tried sticking pea-sized lumps of blue-tack (very briefly) on various parts of my trade fiddle: on and around the bridge, on the wings of the f-holes, on the belly near the lower end of the bass-bar etc. Some wolf-cub-tones disappear, to be replaced by others.
I have another wailing banshee fiddle that probably needs extra bracing: I had to put the sound post directly under the bridge!
Sorry David, if you are squirming! Of course I don’t touch my ”good” violin.
From Lars Silen
Posted on March 11, 2014 at 10:42 PM
About Cello bridges:
I have never adjusted a Cello bridge and I don’t play the Cello. I am sure though that essentially the same ideas work for a Cello too.
The main ideas are:
– There is a main resonance determined mostly by the upper part of the bridge combined with the dimensions of the ”waist” of the bridge. This resonance is set to 2800 – 3000 Hz for a violin and it determines where the most important high frequency boost is located.
What is this frequency for a Cello?
Answer: No idea. If somebody knows please inform me/us!
– The ”holes” in the bridge ears and the heart will colour the sound of the instrument. If the bridge works as on a violin you can add sting/roughness by increasing the bass side ear opening and thinning the ear. Overdoing it will cause the bass to get very dry (for a violin).
– On a violin it is easy to hear that filing the E-side ear you make the bass rounder/softer. Overdoing it makes the bass boomy.
– On a violin the volume/color of the A-string is changed by filing the hole in the heart under the D-string. Overdoing it makes the tone nasal.
– On a violin the volume/color of the D-string is changed by filing the hole in the heart under the A-string. Overdoing it makes the tone nasal.
Notice that the adjustment points are ”mirrored” in relation to the strings. On a violin you can, to some limit correct a nasal tone on the D and A strings by making the bridge feet arc higher. You can thus go forward iteratively.
I guess that the Cello bridge works essentially in the same way but I have never tried it.
On a violin bridge the height of the arch between the feet seems to be important. I don’t know if this is the case for a Cello bridge.
When adjusting it is probably very important that you are able to produce a reasonably good tone when playing the instrument. It is also important to be able to listen to some good instruments that are properly adjusted. If you don’t know what sound you are trying to produce you are essentially blind.
From Lars Silen
Posted on March 11, 2014 at 10:52 PM
The ring modes: http://www.phys.unsw.edu.au/jw/chladni.html
You can also find some very interesting information here when slightly reading between the lines http://www.schleske.de/en/our-research/introduction-violin-acoustics/modal-analysis/animation.html
Another good starting point is: http://www.platetuning.org/html/how_to_tune_plates.html
From Lars Silen
Posted on March 11, 2014 at 11:22 PM
Richard: (Wrong thread actually but…)
My #4 Guarneri was initially very dark/boomy. This means there is an imbalance in the basic ring tone of the top or the bottom. The solution was to make the node line under the tail piece stronger (sanding) and also sanding the bottom ring node line also under the tailpiece both these places make the sound lighter and eliminates the boomyness.
– If the instrument is too boomy correct the fault by adding ”lightness”.
– If the instrument is too dry then add darkness.
From Lars Silen
Posted on March 12, 2014 at 06:47 AM
Comment to: John Cadd and Don Noon
The bridge hill seen as a high frequency boost mechanism to extend the frequency range of the instrument is technically fairly well understood. The response of the body of the violin starts to drop off at around 1.5 to 2 kHz. Adding a strong resonance slightly further up will extend the roughly flat response a further 2 … 3 kHz with a cut off at between 5 and 6 kHz.
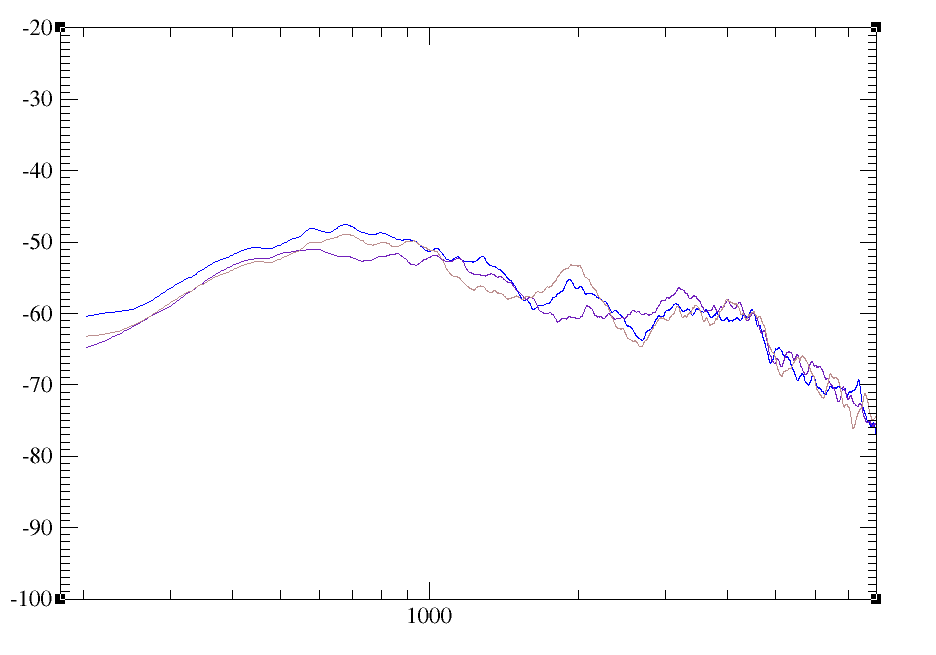
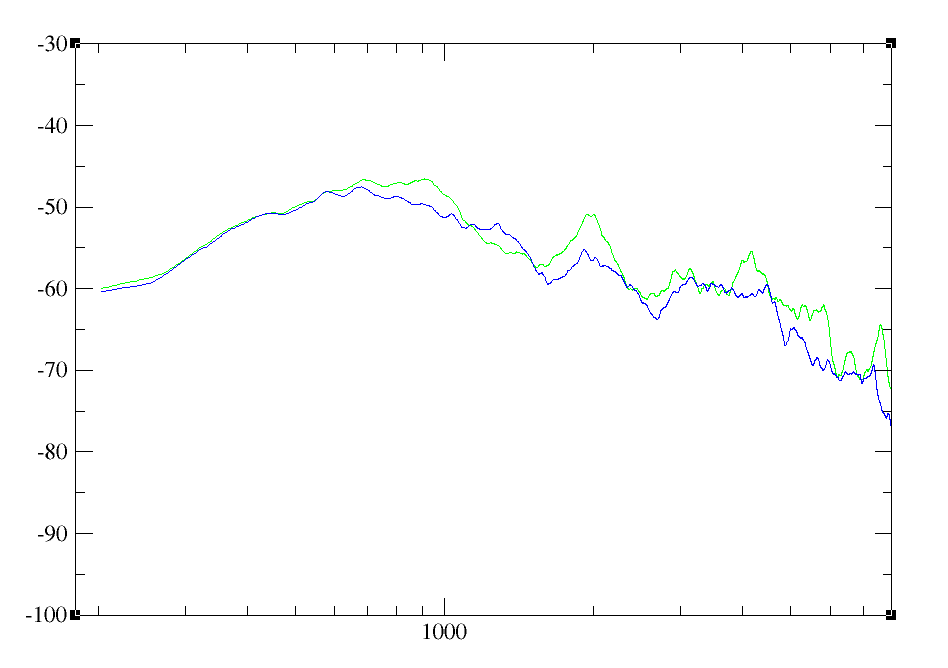
If you measure the tap response of a bridge clamped in a wise you will see a spectrum with the typical ”bridge hill” and you are able to change the main resonance by filing the waist or the topmost vibrating mass.
The problem with the bridge hill is that the spectrum of the bridge is at least as complicated as the spectrum of the violin body. There is roughly an equal number of major resonance peaks in the bridge spectrum as there are the spectrum of the violin body. I have done some series of measurements trying to map how the major peaks ”move” when filing specific parts of the bridge … so far with only partial success. The situation is further complicated by the fact that when the instrument is stringed and playable the mass att the top of the bridge is increased by the mass of the strings and the bridge movements are restricted by the ”support” of the strings.
What are the resonators found in a violin bridge?
– Main resonance caused by the upper vibrating mass mainly modulated by the waist.
– G-side (Bass side) ”Ear”. It is fairly probable that it causes several resonances.
– E-side Ear. It is fairly probable that it causes several resonances.
– The heart and the centre piece of the heart. Filing the centre piece causes audible tonal changes.
– G-side bridge foot stiffness including the traditional accentuated cuts that change high frequency response.
– E-side bridge foot. As above.
– The bridge arc between the feet.
The problem as I see it is that the bridge still is too complicated to handle by measurements only. On the other hand anybody can easily check that even small changes to the bridge ”in situ” may cause strong changes to volume and/or tonal character. I use the rules of thumb I gave above to acoustically adjust the bridge … it simply works.
Why does the tone colour change when the bridge is filed?
Filing the bridge changes the amplitude and position of individual ”minor” resonances in the bridge spectrum. These resonances will modulate the total response of the instrument (remember that all energy flows through the bridge). If you move two resonances close to each other they will tend to ”attract”. When filing the bridge you are able to ”fill” major dips in the tap response of the whole instrument, this improves the sound.
Final note!
I found a very interesting type of wolf note when doing bridge adjustments combined with spectral measurements. I had a wolf note on the tone B (493 Hz). The character of the sound was some kind of metallic ringing (sounded like a resonance stringed violin where two resonance strings touch or a resonance string touches the body). The source of the sound seemed to be a very strong double resonance peak with two peaks separated roughly by 10 Hz at 986 Hz. The problem disappeared when the bridge was further filed and the resonances were further separated. I assume that what technically happened was that the instrument couldn’t decide which resonance to lock to so it started flipping back/forth between the two resonances causing the metallic sound.
From Lars Silen
Posted on March 12, 2014 at 06:55 AM
General comment!
If you try some of the methods indicated above please give feed back! You can reach me through violinist.com or through my web site https://larsil2009.wordpress.com/ .
From John Cadd
Posted on March 12, 2014 at 10:39 AM
I tend to prefer the idea of 10 to 15 bridges being tested which all start off being the same (or very close )design and same(or very close ) wood hardness. Obviously not exactly the same (but very close ). Then each (numbered )bridge would have a slightly different adjustment. Lars methods might be better used to form a reference chart to indicate in detail the effect of each alteration. A bridge lifter could be used to swop the bridges for cross reference.
The maddenening part of changing one ,single bridge is you can`t go back to where you were previously . Telling anyone it sounds ”better” meets a brick wall of skepticism . That`s a problem in itself .
From Lars Silen
Posted on March 12, 2014 at 03:34 PM
Reply to John Cadd:
Obviously any method that works for a builder is OK. The problem with making 10 to 15 bridges to try out, as I see it, is that this still represents an extremely small sample of the space of potentially good bridges. You have at least 5 basic tuning points on the bridge where even small changes will influence the sound. If you want to explore say 5 different sizes for all of those tuning points the number of bridges will be astronomical to this you have to add differences in the bridge material. I think that in reality hundreds or thousands of bridges would be needed to really explore the possibilities.
The situation with tuning a bridge isn’t clear cut. You can actually do the tuning iteratively as long as you don’t do anything really stupid. The process is essentially:
– Tune the bridge to be even on all strings. You want to make the openings as big as possible but without making the tone too nasal/boomy/harsh.
– If you reached the end of the tuning range you can try again with the same bridge by increasing the arc between the feet. This will allow you to increase the openings further till you reach a new dead end … increase the arc again etc. until you start to reach the mechanical limits of the bridge … now you have to make a new bridge.
The key is to learn to listen and this will surely take some time. If you learn to listen then you are also able to make the final changes to the best bridge of the 15 you tested because you know exactly what you want to change. These ultimate changes are not a question of trial and error, you simply know where to do the adjustment to add the touch you want to add.
I simply recommend any person interested in optimizing a violin to try and explore the bridge filing method. The cost is a few hours (days 😉 ) of experimenting and you will destroy one or two bridges. The result is that you will get an extra tool for your toolbox when you know how changes done to the bridge will influence tonal colour and volume. Acoustical tuning automatically takes the instrument body into account because you listen to the bridge/violin combination all the time!